Open
The Open function opens a screen to enter criteria when opening a different schedule. This can be for a different for a single organization unit or for a schedule group and/or for a different date range than the open schedule.
An archived schedule can be opened by accessing the Open Archive tab and completing the screen displayed.
Note
For more information, see .
To open a schedule, complete the following steps:
-
In the tool bar, Schedule menu, select the Open function.
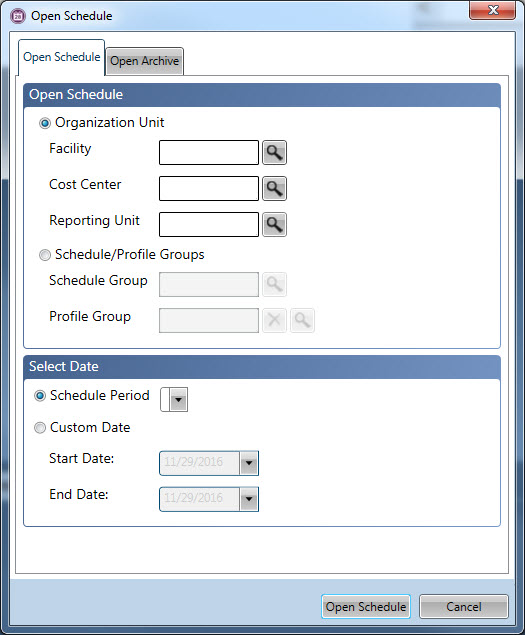
The following screen is displayed.

-
In the Open Schedule area, select the appropriate option button to enable the corresponding selection fields.
-
Select the Organization Unit button to open the schedule for a single organization unit. The trunk level, such as facility, and branch level, such as department, organization unit levels are required. The leaf level, such as unit, level is optional.
-
Select the Schedule Group/Profile Groups button to open the schedule for a Schedule Group, which contains multiple organization units set up together, as well as Profile Groups.
Note
Schedule Groups must be previously set up on the Schedule Group screen. The Profile Groups that are available must be previously added on the Profile Group screen, and then assigned on the Profile screen.
-
-
If defaults are set up for the organization unit or schedule group, these fields are automatically filled. However, a different organization unit or schedule group can be entered. Click on the search icon to the right of the field to access the options for the field.
Note
For more information on setting up a default organization unit, see . For more information on setting up a default scheduling group, see .
-
In the Select Date area, select the appropriate option button to activate the corresponding date fields.
-
Select the Schedule Period option to select a predefined scheduling period for the organization unit or scheduling group. This value defaults to the schedule period that contains the current date. Click the drop-down menu icon to the right of the field to view a listing of the schedule periods.
-
Select the Custom Date option to define the time frame to open. Enter the Start Date to indicate the first day of the date range to open and the End Date to define the last day of the date range. Click the drop-down menu icon to open a calendar to select the dates.
-
-
When all options are filled in, click on the Open Schedule button.
Note
To stop the process of opening the schedule, click on the Cancel button. The set up screen will close.