Adding New Schedules
Adding activity codes and pay codes can be done in several different ways, each with its own advantage. See the subsections below this list for details.
-
Type the activity code or pay code. This method is the quickest way to add a schedule, but requires you to know the codes and the format required for typing them.
-
Use the Add New Code option. This method is good if you are used to using the tool bar and menu options.
-
Double-click a cell. This method is good when you do not know or remember certain details, like a code, because you can search for information. This method is also good when you need to alter a schedule beyond what you can do by typing it. However, with this method, you can only work in one cell at time.
Type the activity code
-
Add an activity by clicking a cell and typing the activity code. For example, type 0700-8 and press Enter.
To change the employee's default profile, type the activity code, a delimiter, and the profile code. For example, type 0700-8 CH to change from the default RN profile to a Charge profile.
-
Delimiters are characters that separate strings of text or numbers. Delimiters can be spaces, commas, or semicolons.
Examples: 0700-8 CH or 0700-8,CH or 0700-8;CH
-
-
You can add an activity to a multiple cells at one time. First, select the range of cells and then type the activity code.
A range of cells can be selected by holding Shift as you click or by clicking and dragging. These cells can span multiple days in a row and across multiple employees. Alternatively, click an employee's name to select all the days for that employee, or click a day in the date header to select all the employees for that day.
Type the pay code
-
Add a pay code by clicking a cell and typing the pay code, start time, and length in hours (all separated by delimiters). For example, type PTO 0000 24 (for PTO starting at midnight and lasting 24 hours) and press Enter.
Leading zeros and colons in the time are not required. For example, these are all acceptable entries: 0700, 07:00, 700, and 7:00
A decimal point in the hours value is allowed. For example, these are all acceptable entries: 8, 8.0, 8.5, and 8.50
-
Delimiters are characters that separate strings of text or numbers. Delimiters can be spaces, commas, or semicolons.
Examples: PTO 0000 24 or PTO,0000,24 or PTO;0000;24
-
-
You can add a pay code to a multiple cells at one time. First, select the range of cells and then type the pay code details.
A range of cells can be selected by holding Shift as you click or by clicking and dragging. These cells can span multiple days in a row and across multiple employees. Alternatively, click an employee's name to select all the days for that employee, or click a day in the date header to select all the employees for that day.
Use the Add New Code option
To add a new code to one or more cells, complete the following steps:
-
In the schedule grid, highlight the appropriate cell or cells .
A range of cells can be selected by holding Shift as you click or by clicking and dragging. These cells can span multiple days in a row and across multiple employees. Alternatively, click an employee's name to select all the days for that employee, or click a day in the date header to select all the employees for that day.
-
Use one of following methods to add schedule:
-
Right-click to display the menu and select Add New Code. OR
-
From the tool bar, select the Edit menu, then the Add New Code option.
The outline of an activity box is shown in the cell.
-
-
Type the activity code or pay and press Enter.
-
Activity code: enter the activity code, such as 0700-8
To change the employee's default profile, type the activity code, a delimiter, and the profile code. For example, type 0700-8 CH to change from the default RN profile to a Charge profile.
-
Pay code: enter the pay code, start time, and length in hours (all separated by delimiters), such as PTO 0000 24 (for PTO starting at midnight and lasting 24 hours)
Leading zeros and colons in the time are not required. For example, these are all acceptable entries: 0700, 07:00, 700, and 7:00
A decimal point in the hours value is allowed. For example, these are all acceptable entries: 8, 8.0, 8.5, and 8.50
Delimiters are characters that separate strings of text or numbers. Delimiters can be spaces, commas, or semicolons.
Examples: 0700-8 CH or PTO,0000,24 or PTO;0000;
-
Double-click a cell
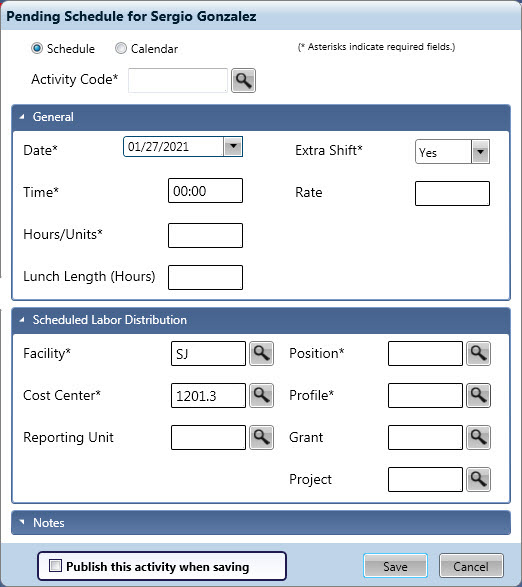
Double-clicking a cell opens a schedule dialog box. This is useful if you want to search for an activity code, to assign a different profile than the default, or to enter different start and end times than the original activity code.
Some of the information in this screen is already defaulted from the schedule screen, and other information is defaulted once the activity code is filled in. The defaulted information can be left or replaced with different values. Type in the value or click the search icon ![]() to open a menu of valid options to select for the field.
to open a menu of valid options to select for the field.
To add a new schedule using the schedule dialog box, complete the following steps:
-
Double-click in a cell.
The schedule dialog box appears.

-
Select the option to indicate whether this is for a Schedule (activity code) or for a Calendar (pay code).
-
Update any pre-filled information, and enter or search for the details to complete the needed fields.
-
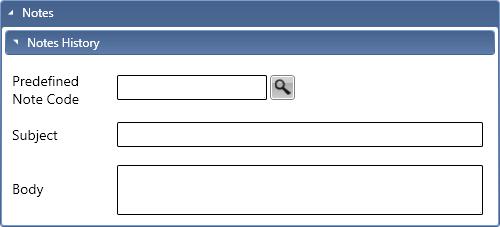
To add a note to this schedule, expand the Notes section.

-
A Predefined Note Code can be selected to automatically load subject and body information.
-
If a predefined note is not selected, enter a Subject for the title of this note. In the Body field, enter the free-form text for information regarding this note.
-
Select the Publish this activity when saving option to automatically launch the publishing process for this schedule.
If this is not selected, the schedule remains pending.
-
When all fields are complete, click on the Save button to save this schedule and close this box.