Apply Staffing Template
The Apply Staffing Template function opens a screen to select and assign a staffing template to the staffing plan for all or part of the open schedule, assuming that a staffing template has not already been applied.
The values set up in the staffing template are replicated to fill all weeks of the schedule. For example, if the staffing template is set up for one week, the template is replicated four times to fill a 4-week schedule.
This option is only available when the schedule for a single organization unit is open; it is hidden when a schedule group is open.
To apply a staffing template to a schedule, complete the following steps:
-
From the tool bar, click Tasks and then click Apply Staffing Template.
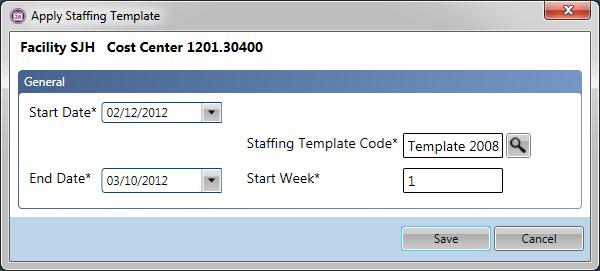
The Apply Staffing Template dialog box appears.

-
Enter the Start Date and End Date of the date range to have the staffing template reapplied. The start and end dates of the open scheduling period are automatically loaded, but can be changed, as long as they fall within the scheduling period of the open schedule.
-
To apply a staffing template to a date range outside the range of the open schedule, close this screen, open the schedule to a date range which includes the entire date range to apply, and then reopen this function.
-
If the date entered in the Start Date field is earlier than the current date, a message is generated to select which staffing values are updated. See step 7 below for more information.
-
-
The Staffing Template Code value displays the default staffing template, but another template can be selected.
Note
The Default staffing template is selected on the Staffing Template screen for the open organization unit. For more information, see .
-
The Start Week number indicates which week of the template should be aligned with the first week defined in the Start/End date fields. This number defaults to 1 but can be updated.
-
When the fields are all configured, click Save.
-
If the Start Date field contains a date that is before the current date, the following message appears, "The start date you have entered is in the past. This action may result in overwriting existing data."
-
If Yes is selected, the system will apply the values in the Staffing Template to all dates within the selected date range, including dates in the past. Therefore, any staffing values that were previously updated (either manually or by using the Recalculate Staffing Needs wizard) will be overwritten with the Staffing Template values, and the updates will be lost.
-
If No is selected, the system will apply the values in the Staffing Template to all dates in the range that fall on or after the current date. Any values in the staffing plan previous to the current date will not be updated. Therefore, any staffing values that were previously modified (either manually or by using the Recalculate Staffing Needs wizard) will not be affected.
-
If Cancel is selected, the wizard is closed and no values are updated.
-
-
When the action is complete, the schedule screen is reloaded. The updated staffing template values are accessible from the Balancing Grid section of the schedule.
Note
From this screen, only existing staffing templates can be loaded to the staffing plan. To manually update any of the values for the staffing plan, go to . Open the staffing plan for the required organization unit and scheduling time frame. Click on the Open Staffing Plan button, make modifications to the displayed grid and save the record. The values are updated to the schedule needs grid.