Schedule Screen Overview
The purpose of this information is to give you an explanation of the different parts of Staffing and Scheduling's Schedule screen and the functions available to you.
Performance consideration
The Schedule screen can support the following usage scenarios with minimal performance issues:
-
A six-week schedule period with 3,000 employees (each with one schedule per day)
-
A four-week schedule period with 4,500 employees (each with one schedule per day)
Note that these scenarios are approximations. The number of supported employees can change with different length schedule periods and having more or fewer transactions per day.
Overview
The Schedule screen is used to view, add, edit, and delete employee schedules and to view the staffing coverage for the selected organization units and date range. It is a powerful scheduling tool and while this guide gives you a good overview of it, you should contact symplr Customer Support if you have any questions or complex scheduling situations.
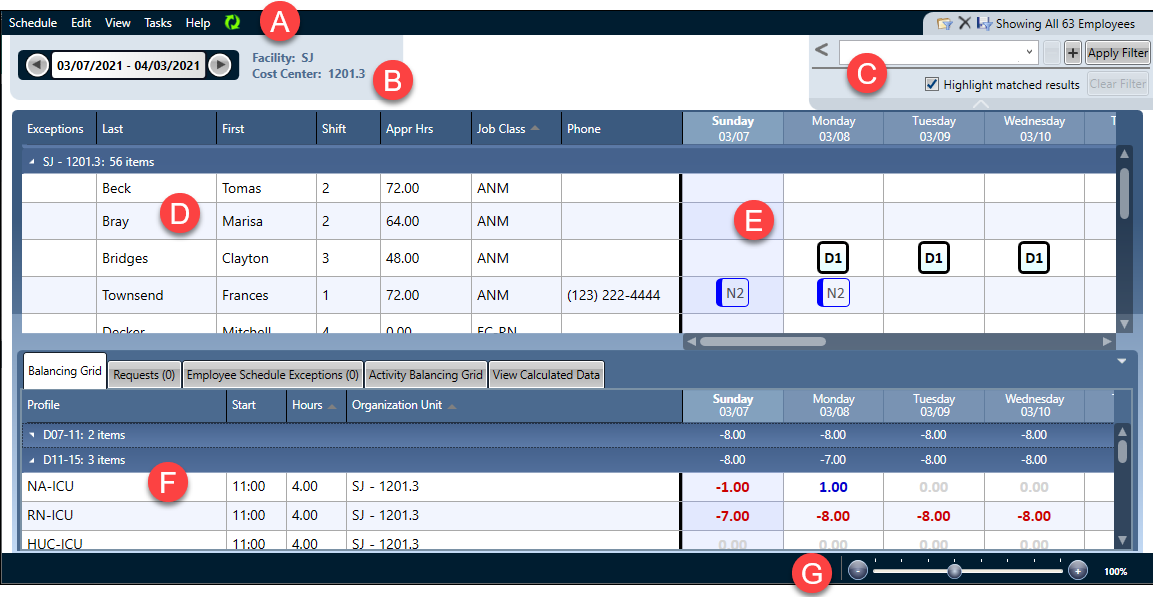
The structure of the Schedule screen is labeled and explained in the following image and table.

The schedule screen is divided into the following areas:
|
Letter on image |
Area |
Description |
|---|---|---|
|
A |
Toolbar |
The toolbar displays menu options for various functions. Click a menu option, such as Schedule or Edit, to view the related functions. |
|
B |
Schedule period navigator |
The navigator displays the date range of the schedule you are viewing. Click the left or right arrow to move to the previous or next schedule period. |
|
C |
Schedule filter |
The filter allows you to display only the information you are interested in or to limit the visible data. For example, you can add a filter that allows you to only see RNs working the Evening coverage period. |
|
D |
Employee information |
The employee information area displays the names of the employees in the open schedule. Other employee details are available, such as phone number, seniority date, approved hours, and scheduled hours. In addition, when you rest on a name, details are available in a tooltip and can display different details than what you see on the screen. |
|
E |
Schedule grid |
The schedule grid area displays the employees' schedules and allows you to view, add, edit, and delete schedules. When you rest on a schedule, a tooltip displays the profile, activity code, start and end times, and organization unit for the schedule. |
|
F |
Schedule period information |
This area contains tabs used to view specific information about the schedule you are viewing. For example, the Balancing Grid displays the staffing coverage and need. The values in these cells can show you the need, the coverage, the variance (as shown in the previous illustration), or a coverage/need fraction. When you rest on a cell, a tooltip displays the coverage, need, and variance. Tip Click on a cell and the employee schedules that are providing coverage for that profile/date are highlighted in the schedule grid. Other tabs include: Requests, Employee Schedule Exceptions, Activity Balancing Grid, and View Calculated Data. |
|
G |
Information bar |
The information bar displays, on the left side, the status of any processing happening for the Schedule screen, such as Synchronizing schedule and Synchronizing employee exceptions. These messages only appear as the system is completing a process; normally, this area is blank. On the right side of the information bar, a zoom slider allows you to zoom in and out to make viewing the screen more manageable for you. |
Related information